How to Start Shooting and Selling Stock Videos
Whether you’ve already tried your hand at shooting stock videos or you’re just starting out, it’s good to polish up on some basics. Learn the basic camera techniques to help you get started in shooting stock videos and keep up with the latest trends to help you determine what to shoot. At the end of the day, you should really concentrated on how to make a good stock video and we’re here to help.
1. Learning the basic camera techniques
To start shooting video, you need to turn your camera to full manual mode. While automatic mode can be alright for home videos, it would be more professional to decide for yourself which settings to use and what to focus on.
Resolution
It is advisable to shoot in full HD mode so set your camera to the highest resolution possible. You will be uploading your work to websites where quality is a priority.
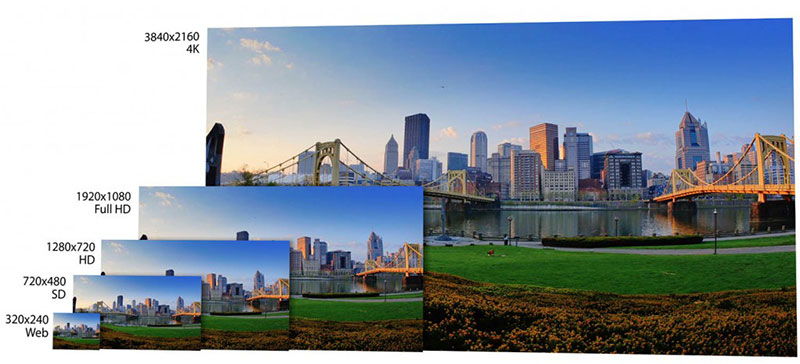 Image credit: http://orlowskidesigns.com/
ISO
The lower your ISO number the more light you will need to have a well exposed video. Setting a higher number will result in a reduced video quality which will appear quite grainy. If you are shooting outside, set your ISO to the lowest number possible. If you are shooting indoors, raise your ISO but do not set it to more than 800.
 Image credit: http://www.exposureguide.com/
White balance
Some cameras refer to white balance as ‘color temperature. Be aware that there are 2 types of light – natural and artificial. If you’re shooting outdoors, make sure your white balance is set to the outdoors mode. If you are shooting under artificial light, choose the ‘light bulb’ icon.
Shooting in the wrong white balance mode can cause discoloration in our videos and sometimes a blue hue.
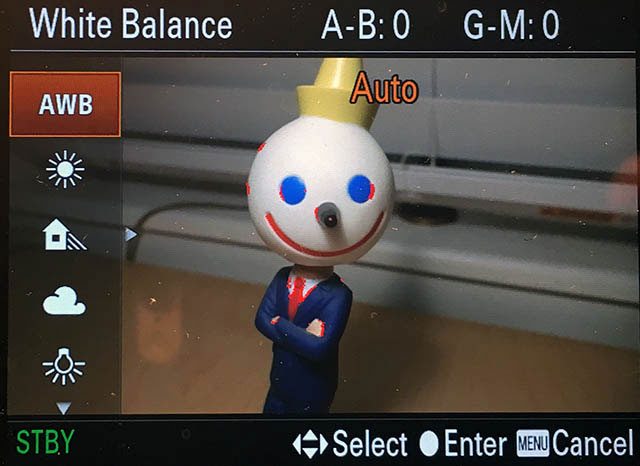 Image credit: http://orlowskidesigns.com/
Frame rate and shutter speed
The shutter speed should be half the frame rate of your video. For instance, if you’re shooting 50 frames per second, your shutter speed needs to be 1/100s. This ensures a smooth motion between frames.
The higher your shutter speed, the crisper your video will be. A common mistake is to use higher shutter but do keep in mind that videos that are too sharp and have defined edges have a ‘cheap’ look that is undesirable. It is a characteristic of cameras set in full automatic mode which doesn’t look very professional.
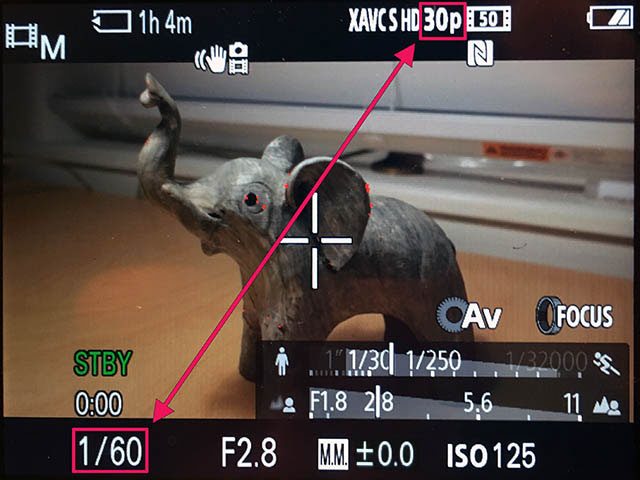 Image credit: http://orlowskidesigns.com/
Aperture settings
The aperture settings determine how much light enters the camera which is very important when shooting professional videos. It is also referred to as the ‘F stop’ number. The lower the number, the more open the iris and consequently the more light is let in. In low-light sceneries, you should use a lower F-stop number. For brighter, outdoor scenes, it is advisable to use a higher F-stop number.
 Image credit: http://www.exposureguide.com/
Be very careful with the settings because if the iris is too open, your shots will be over exposed and if it is closed too much, your frames will be underexposed. To find the ideal number, check your viewfinder which tells you how exposed your shots are.
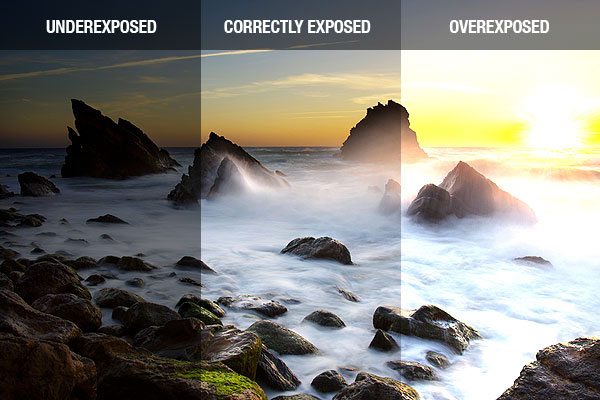 Image credit: http://www.exposureguide.com/
Focus
When shooting in manual mode, the last thing you need to be aware of is the focus. This can sometimes be difficult to adjust in the process of filming which is why you should always do test shots.
With a lower F-stop number, focusing can be trickier as focus and aperture are related. Focusing is much easier with a higher F-stop number when you’re shooting outdoors. This is one of the reasons why you should shoot outdoors when you’re just starting to learn the tricks.
2. Capturing motion
Videos are all about motion. Whereas with photographs you freeze a moment in time, in video it is all about the movement you’re capturing. There are two ways to go about it; shooting moving objects and moving the camera to show motion.
Showing motion is a great opportunity to tell a story. With time, you will be able to develop your own cinematic style as you’re implementing your ideas. Think about the value motion adds to your frames and brainstorm on ideas with this in mind.
3. Keeping up with the trends
Knowing what customers are looking for is the best way to approach stock videos. From simple timelapses to specific themes and trendy topics, customers are looking for footage that can help tell their brand story. Here is where trends come in to help you.
Most popular stock video categories
The one thing you have to keep in mind as you’re shooting is staying true to an authentic style. Make videos relatable to people, add a personal twist to them and avoid being generic.
 Image credit: Rawpixel (top left), william87 (bottom left), Monkeybusiness (top right), yanlev (middle right), CelsoDiniz (bottom right)
4. Take your camera everywhere
Everyday is a new opportunity to photograph and also film – stock footage is all around you. As you go on your personal adventures, bring your camera along and experiment a little. Something as simple as people walking to their destinations can prove to be popular.
Alternatively, you can choose the themes you want to work with and arrange corporate business photo shoots (as an example). Regardless of the theme you choose, be on the lookout all the time and train yourself to tell a story from your unique perspective.
5. Start selling
If you don’t have an account with Depositphotos yet, go ahead and register! You can become a contributor today and start uploading and selling your footage.
Don’t rule out your old projects. Look through your hard drive for videos that can be edited and used as stock footage. Once you have a great collection, the rest is easy. Crop, edit and upload.
Try to view stock footage as an art form. It needs preparation, practice and a bit of a creative edge. Spend time in the initial concept stage and give yourself even more time to execute your concepts.

