Winning Composition: Using the Rule of Thirds in Design
Our brains are programmed to look for patterns. More often than not, we are attracted to symmetry. Designers use basic principles of design on a daily basis for visual harmony so that their work appeals to all of us. In truth, you don’t have to submerse yourself in detailed articles about the golden ration or study the Fibonacci sequence to improve your designs. You can create well balanced, appealing designs using a simple rule – the rule of thirds.
The rule of thirds states that you can use a grid to guide your design – this grid splits any canvas into 3 equally sized horizontal and vertical sections. You can use this grid in your camera to compose better shots, but also in Photoshop to guide your design.
This 3×3 grid is like a roadmap to show you where to place emphasis and how to align your objects (or subject in the case of photography). Remember that when you’re designing, the grid should be drawn according to your canvas, excluding the border, to make sure you don’t place key elements in an unproportional way.
Rule of thirds in design
The rule of thirds creates intersections on your canvas. The areas where the lines intersect is where you should place your focal points. As long as you bring your focal points somewhere closer to these intersections, they will stand out more. Objects that are further away from the intersections will be less of a focal point
Mind you, this does not mean you have to always place your objects along the intersecting lines for perfect symmetry. The beauty of the rule of thirds is that it is a guide to better visual symmetry which also includes asymmetry.
As stated earlier, our brains look for these patterns. When you place your objects on two of the intersecting points to create asymmetry, the brain registers that something is different and those compositions actually tend to be more engaging. This is why the rule of thirds is so helpful, because it gives room to experiment with something outside the perfect symmetry while keeping your composition balanced.
What’s wrong with this image?

There is something very off putting about this composition. There is no clear balance between the elements, and you probably wouldn’t have to think twice to click the button. If you keep reading, you’ll find out how we turned this composition into something a little more, well, presentable using the rule of thirds.
Although this image isn’t symmetrical, perfect symmetry is far from being the necessary component of good design. We can all agree, that balance certainly is and that’s an important element missing in the above composition. Using the rule of thirds as your guide, you’re setting yourself up for more balanced, and visually appealing compositions. Here’s how you can learn to apply this knowledge today:
A layout for balance
For this tutorial, we’re going to look at designs by laying the grid on top of them. Below is an example of a cover we created. You can immediately sense that this is a well balanced composition, but why is that?

When you put the grid on the image, it becomes more evident. You can see how the rule of thirds grid was used as a guide to create this asymmetrical design. Important visual elements are placed on the right and left of the grid. The image on the right section is balanced by all the elements on the left. The points of intersection include all the most important information.

Here is another example of a well balanced graphic. This one uses a different kind of balance to keep the text in harmony with the visuals.
Balancing text and image

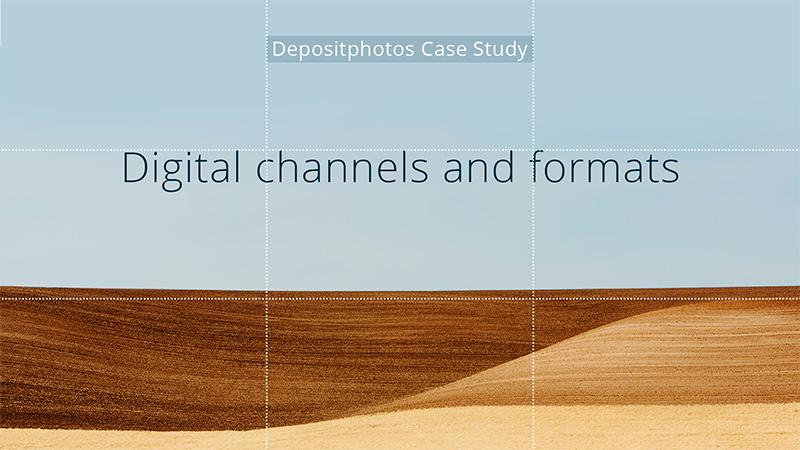
Again, if we apply the grid to our canvas, it becomes evident that the rule of thirds was used to create the presentation cover. The bottom part of the image takes up exactly ⅓ of the canvas, while the text is placed on the intersecting sections of the grid for emphasis. Had the text been placed above the first horizontal guideline, the composition would have been thrown off balance.

This simplified graphic goes to show that the rule of thirds can help you keep a balanced composition as long as the grid is proportional to the canvas.
Square formats work too

All the important elements are placed along the leading lines, at their intersections. This is an example of perfect symmetry where individual elements are balanced if the composition were folded in half. Again, intersection points are used for emphasis.

With more complex compositions in design, you can use the grid for visual balance with text and visuals. Here you can see that symmetry was achieved by placing important elements in every quadrant of the grid.
Applying your knowledge to more complex designs

The most important information that is meant to be the emphasis is placed at the intersecting points of the grid. The rest of the information is distributed according to the weight of the text, both at the top and bottom of the grid.

Now that you’ve seen these examples, try designing with the help of the grid. This option is easy to enable in Photoshop and will make you conscious of your choices as you’re designing leaflets, presentations, business cards and the like.
Proportion is such an important principle in design. With this tool, you can make better layout decisions and ultimately more eye-catching designs.


